n8n is a powerful low-code workflow automation platform that lets you connect APIs, databases, and apps through visual workflows. In this guide, you’ll learn how to integrate the Sectors Financial API with n8n to automate financial data workflows—from simple API calls to scheduled reports sent directly to Discord. Automating financial data workflows can save hours of manual work and reduce errors. Whether you’re tracking daily market movements for investment research, monitoring portfolio companies, or building alerts for trading signals, n8n provides a visual way to orchestrate these tasks without building custom backend infrastructure. Instead of writing scripts that handle HTTP requests, authentication, scheduling, and error handling, you can drag and drop nodes on a canvas and let n8n manage the complexity.Documentation Index
Fetch the complete documentation index at: https://docs.sectors.app/llms.txt
Use this file to discover all available pages before exploring further.
Overview
In this recipe, you will learn how to:- Create your first n8n workflow with the Sectors API
- Set up authentication using Header Auth credentials
- Build a basic workflow to fetch company reports
- Create a scheduled workflow that sends daily top movers to Discord
- Work with the Code node to transform data
Understanding n8n Workflows: Architecture and Design
n8n is built around the concept of nodes and connections. Each node represents a discrete action—triggering a workflow, calling an API, transforming data, or sending a notification. Connections between nodes define how data flows through your automation, creating a visual representation of your entire process. This makes it easy to see the big picture at a glance while still being able to modify individual steps without touching infrastructure code. Our first workflow demonstrates the foundational pattern: a manual trigger connected to an HTTP request. Manual triggers let you execute workflows on-demand, perfect for testing or building tools that run when you need them. The HTTP Request node handles API authentication, makes the call to Sectors API (or any API), and returns structured data—all without writing fetch calls or managing headers manually. This pattern is the building block for all API integrations in n8n. The second workflow introduces three critical concepts for production automation:- Scheduled triggers: Instead of running on-demand, scheduled triggers execute workflows automatically at specific times (daily at 7 AM, every hour, etc.). This transforms your workflow from a manual tool into a fully automated process.
- Data transformation with Code nodes: APIs often return raw data that needs formatting before it’s useful. The Code node lets you write JavaScript to transform, filter, and structure data between steps. In our case, we’ll format stock market data into a human-readable message.
- Webhooks for external integrations: Webhooks are special URLs that accept POST requests. When n8n sends data to Discord’s webhook URL, Discord automatically posts it in the configured channel. This pattern—calling an API, transforming the response, then pushing it to an external service—is one of the most common automation workflows.
Why These Patterns Matter
These workflows teach reusable patterns that extend far beyond Sectors API and Discord. Once you understand how to authenticate with an API, schedule a workflow, and transform data, you can apply the same concepts to hundreds of integrations: Slack notifications, Google Sheets updates, database operations, email alerts, and more. The visual workflow approach means you can build, test, and modify automations without maintaining custom scripts or server infrastructure.Prerequisites
Before you start, make sure you have:- A Sectors account on the Standard or Professional plan — sign up at sectors.app
- A Sectors API key — found under API → API Keys in your account
- An n8n instance — either n8n Cloud or self-hosted
- (Optional) A Discord server — for the scheduled workflow example
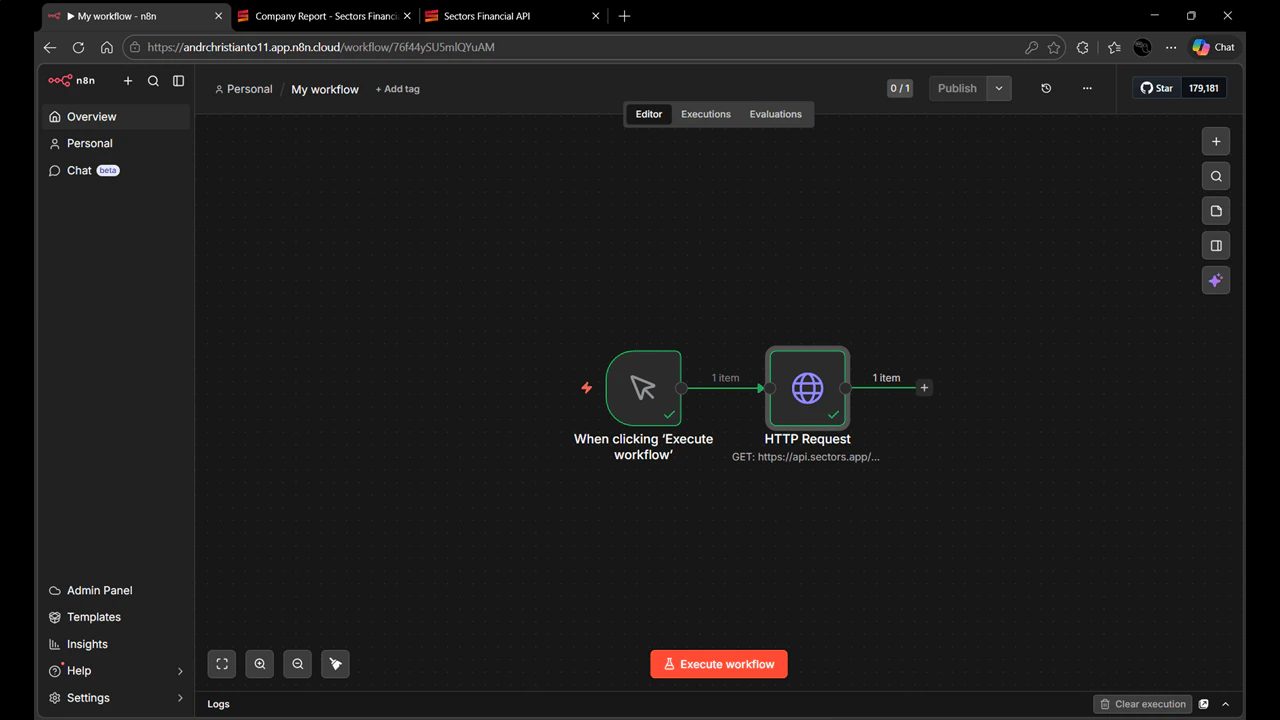
Workflow 1 - Your First API Call: Company Report
Let’s start with a simple workflow that fetches a company report from the Sectors API when you manually trigger it.Workflow Components
This workflow uses two nodes:- Manual Trigger — Executes the workflow when you click “Execute Workflow” in the n8n interface. Manual triggers are perfect for on-demand operations like testing, ad-hoc queries, or building interactive tools. Unlike scheduled triggers that run automatically, manual triggers give you full control over when the workflow runs.
-
HTTP Request — Makes an authenticated API call to the Sectors Company Report endpoint. This node handles the HTTP request lifecycle: constructing the URL, adding authentication headers, sending the request, and parsing the JSON response. Instead of writing
fetch()calls and managing headers manually, you configure these settings in a visual interface.
1. Create a New Workflow and Add a Manual Trigger
- Log into your n8n instance and navigate to the workflows page.
- Click “Start from scratch” to create a new blank workflow.
- On the empty canvas, click “Add first step…” or the + button.
- When asked “What triggers this workflow?”, select “Trigger manually”.
2. Add an HTTP Request Node
- Click the + button next to your trigger node.
- In the “What happens next?” panel, search for “http request” and select it.
- The HTTP Request configuration panel will open.
3. Configure the API Endpoint
Before configuring the node, check the Sectors API documentation for the Company Report Endpoint. The endpoint for company reports is:- Method:
GET - URL:
https://api.sectors.app/v2/company/report/BBCA
BBCA (Bank Central Asia) as an example ticker. You can change this to any valid Indonesian stock ticker.
4. Set Up Authentication
The Sectors API requires an API key passed via theAuthorization header. Here’s how to configure it:
- In the HTTP Request node, find the Authentication dropdown.
- Select “Generic Credential Type” → “Header Auth”.
- A dialog will appear to create a new Header Auth credential.
- Go to Sectors Financial API and create/copy your API key.
- Back in n8n, fill in the Header Auth fields:
- Name:
Authorization - Value: Paste your Sectors API key
- Name:
- Click Save at the bottom of the dialog.
Authorization and the value to your API key, n8n will automatically include this header in every request made by this node.
5. Test the Workflow
Now your HTTP Request node should be fully configured:- Method:
GET - URL:
https://api.sectors.app/v2/company/report/BBCA - Authentication: Generic Credential Type → Header Auth
Workflow 2 - Scheduled Daily Top Movers to Discord
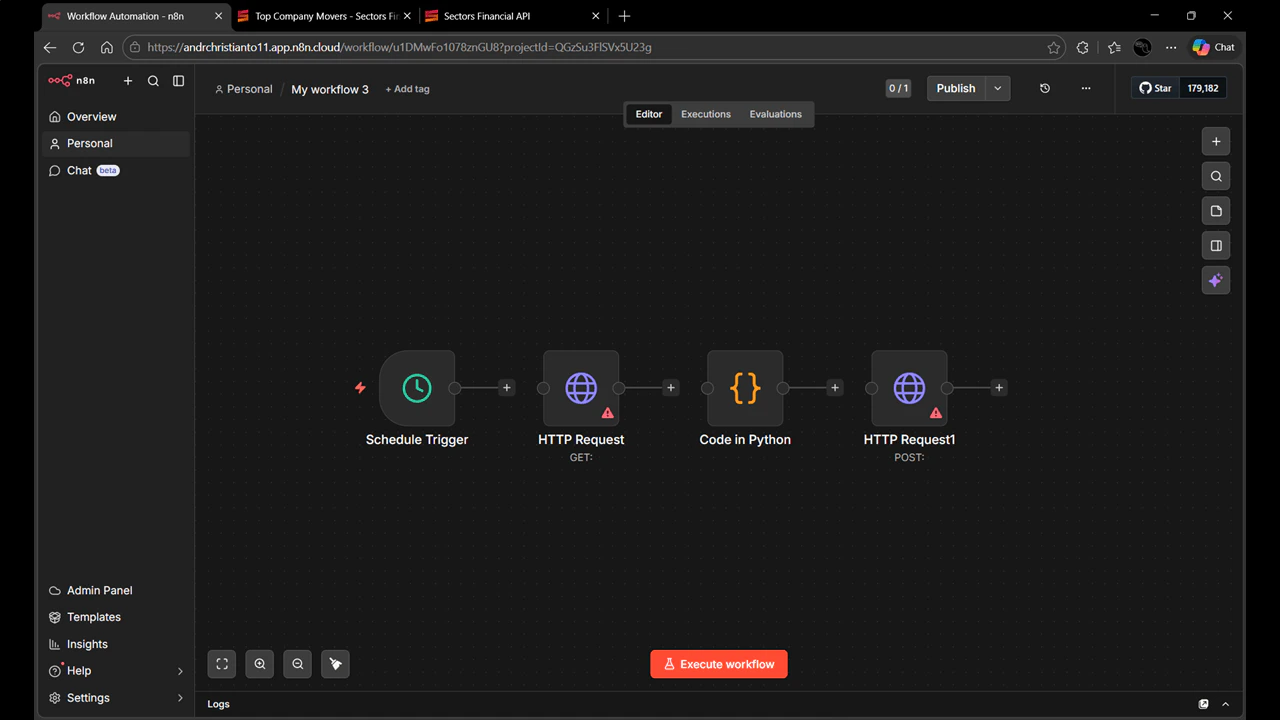
Now let’s build a more advanced workflow that automatically fetches the top stock movers every day and posts them to a Discord channel.Workflow Components
This workflow demonstrates a complete automation pipeline with four nodes:- Schedule Trigger — Runs the workflow automatically at 7:00 AM every day. Unlike manual triggers, scheduled triggers execute workflows at specific times without human intervention. This is the foundation of automation—turning a tool you run manually into a process that happens automatically. You can configure schedules using cron expressions or visual time pickers.
-
HTTP Request (Sectors API) — Fetches the top gaining and losing stocks from the Sectors
/v2/companies/top-changes/endpoint. This uses the same authentication pattern as Workflow 1, but now it’s part of an automated process rather than an on-demand query. - Code (JavaScript) — Transforms the raw API response into a formatted Discord message. The Sectors API returns structured data with arrays of stocks, prices, and percentage changes. The Code node lets you write JavaScript to extract this data, format it with emojis and markdown, and structure it exactly how you want it to appear in Discord. This is where you add custom business logic—filtering stocks, calculating metrics, or customizing the message format.
- HTTP Request (Discord Webhook) — Posts the formatted message to Discord. This demonstrates the webhook pattern: instead of using a Discord-specific integration, we use Discord’s webhook URL (a generic HTTP endpoint) to send messages. This same pattern works for Slack webhooks, Microsoft Teams, or any service that accepts HTTP POST requests.
1. Add a Schedule Trigger
- Create a new workflow (or continue in the same one).
- Add a Schedule Trigger node.
- Configure it to run daily at 7:00 AM. The time is arbitrary — pick whatever makes sense for your use case. For a market report, early morning means your team sees it before the trading day starts.
2. Fetch Top Movers from Sectors API
- Add an HTTP Request node after the Schedule Trigger.
- Configure the HTTP Request:
- Method:
GET - URL:
https://api.sectors.app/v2/companies/top-changes/ - Authentication: Generic Credential Type → Header Auth (use the same credential you created earlier)
- Method:
3. Set Up Discord Webhook
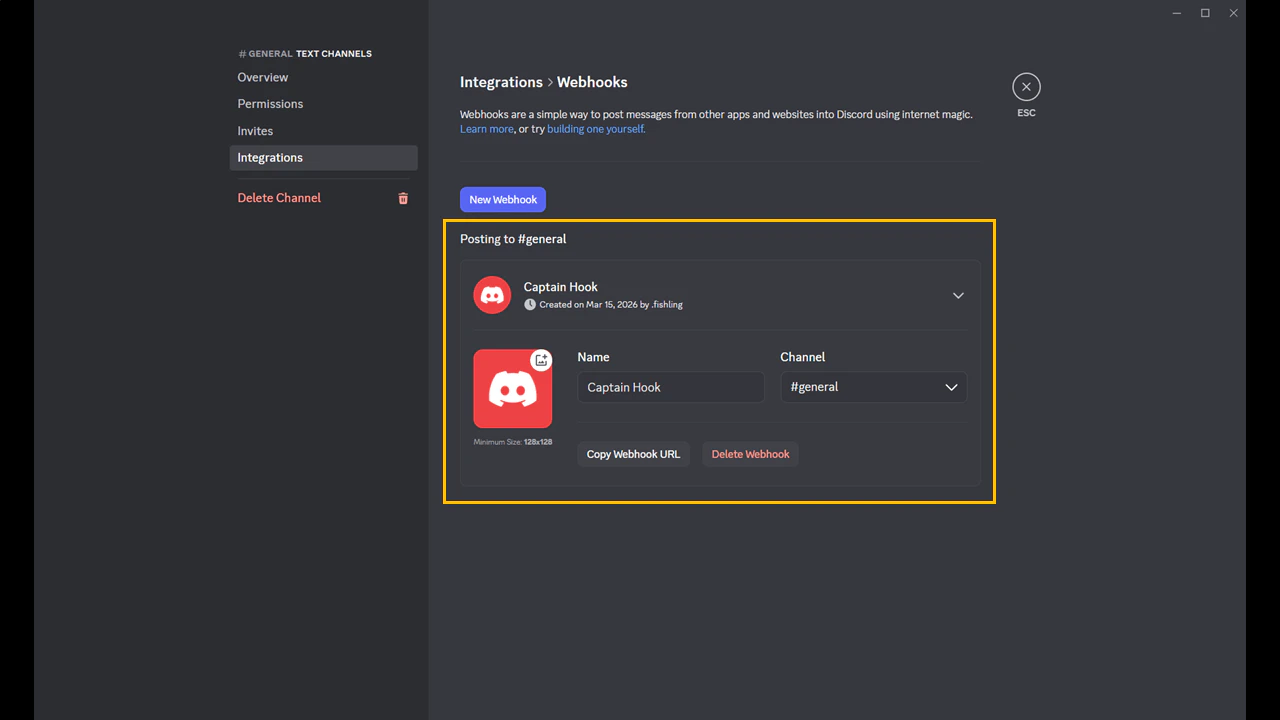
Discord webhooks allow external applications to post messages to a channel. Here’s how to create one:-
Open your Discord server and select the channel where you want to receive the reports (e.g.,
#general). - Hover over the gear icon and click “Edit Channel”.
- Go to Integrations → Webhooks.
- Click “Create Webhook” or “New Webhook”.
- Give your webhook a name (e.g., “Captain Hook”) and select the channel.
-
Click “Copy Webhook URL” and save it for later.
content field and posts it as a message in the configured channel — no bot setup, no OAuth, no Discord account required in your workflow. This is fundamentally different from an API call you initiate: with a webhook, you are the one pushing data, and the receiving service decides what to do with it. The same pattern works identically for Slack, Microsoft Teams, and most modern notification platforms.
4. Add a Code Node to Format the Data
The raw data from the Sectors API needs to be transformed into a human-readable Discord message. This is where the Code node comes in—it allows you to write custom JavaScript to transform data between nodes.- Add a Code node after the HTTP Request.
- In the configuration panel:
- Run Once for All Items: Keep this selected (default)
- Language: Choose JavaScript
- Replace the default code with the following. It does three things:
- Extracts top gainers and losers from the one-day timeframe in the API response
- Formats each stock into a readable line with its symbol, name, price, and percentage change
- Assembles everything into a single Discord message string
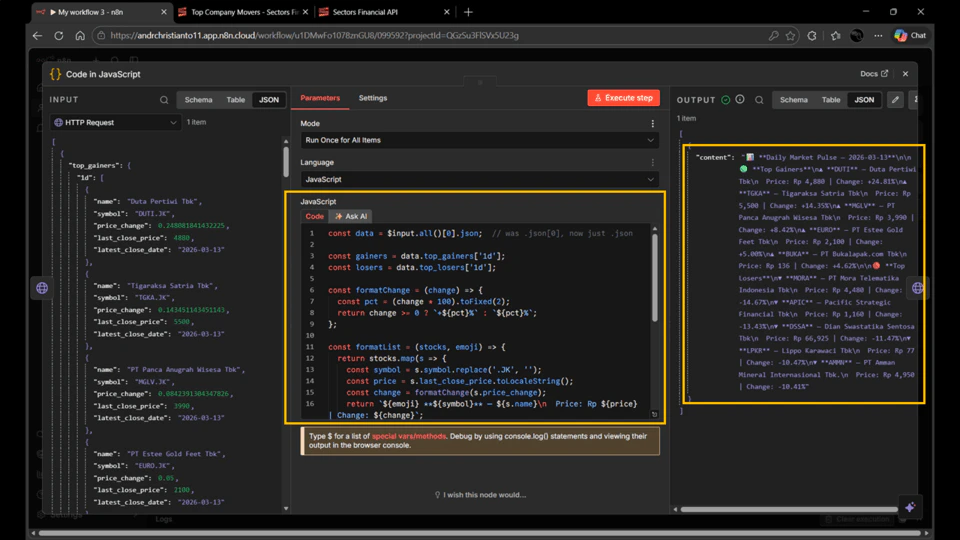
formatChangemultiplies by 100 — the API returns raw decimals (e.g.0.05), so this converts to a readable percentage and prepends a+sign for positive moves.JKis stripped from symbols — the API returns tickers likeBBCA.JK; removing the suffix keeps the output clean for displayreturn [{ json: { ... } }]— this is the structure n8n expects when passing data between nodes; each item must be wrapped in an object with ajsonkey
5. Add HTTP Request to Post to Discord
- Add another HTTP Request node after the Code node.
- Configure it to post to Discord:
- Method:
POST - URL: Your Discord webhook URL (from Step 3)
- Send Body: Toggle ON
- Body Content Type:
JSON - Specify Body:
Using Fields Below
- Method:
- In the Body Parameters section, add a parameter:
- Name:
content - Value:
{{ $json.content }}
- Name:
{{ $json.content }} expression references the content field from the previous Code node’s output. This is how data flows between nodes in n8n—each node can access the output of previous nodes using these expressions.
6. Test and Publish the Workflow
- Click “Execute workflow” at the bottom of the screen to test it manually.
- All four nodes should execute successfully (shown with green checkmarks).
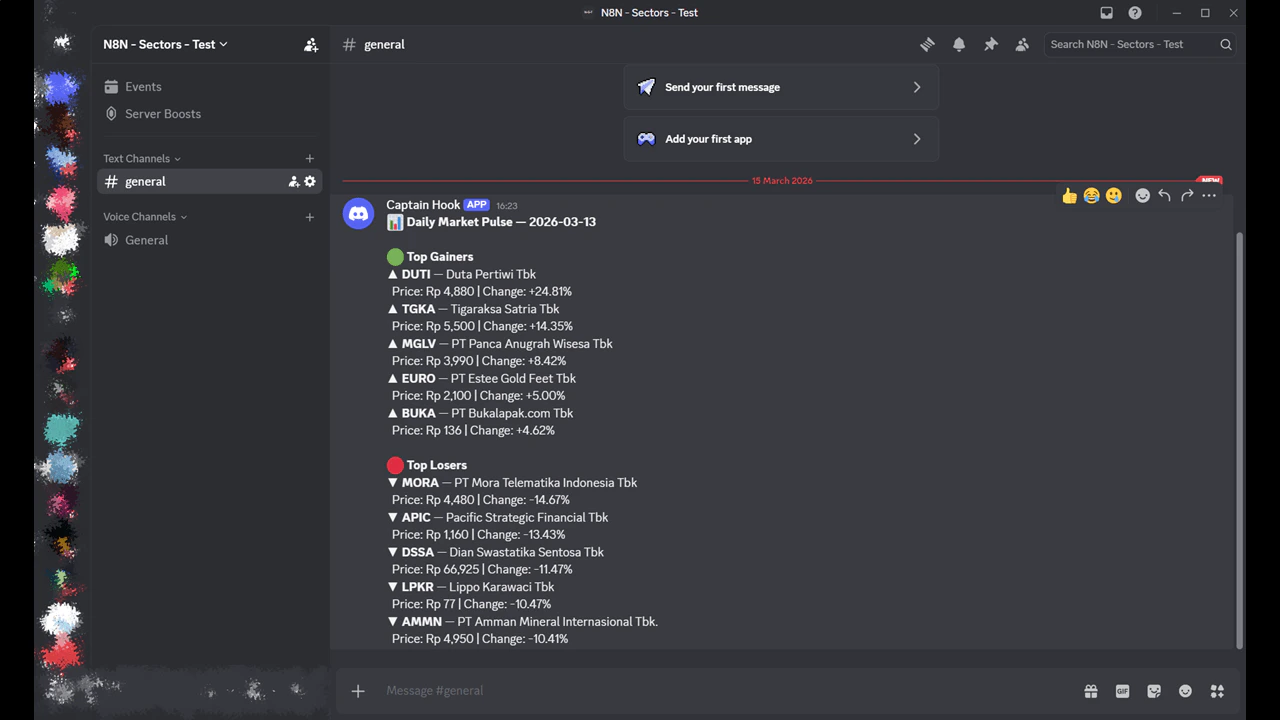
-
Check your Discord channel—you should see the top movers message posted:
- Once testing is successful, click the “Publish” button at the top right.
-
Provide a version name (e.g.,
v1.0) and description (e.g.,First Publish). - Click “Publish”.